I know there is a Make It Monday link up somewhere.
Help please? Thanks.
The Creative Maven issued a challenge for National Sewing Month - the Sew 5 Challenge.
Sew, I present for your perusal
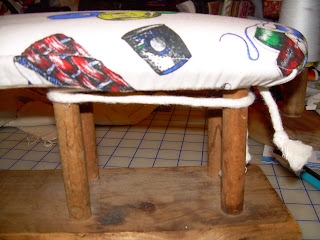
My new little ironing board cover!!!
[Trumpets doing that duh duh-ta-dah thing]
Technically it's a sleeve board - a gift from one of my sewing mentors, Maisie. [You may read more about her here.] Her son built it for her long, long ago. I use this as my gotta iron something small real quick-like when I am sewing.
Maisie had covered it, nicely, with a cotton cover sewn by hand.
But the cotton was worn and there was no padding.
The other night - when I was supposed to be sewing something else - I decided NOW is the time to recover this baby.
I put a drawstring casing around the cover so that it can be removed for laundering.
Here's How I Did It
Stanley Kitteh helped me remove the old cover.
Aren't Kittehs the best sewing/knitting/crafting helpers?
[I'm rolling my eyes too]
I grabbed a scrap of batting, Insul-Brite, the cotton cording that I use in piping and a wide enough plus several inches scrap of sewing themed fabric.
Layered, from the bottom up, Insul-Brite and batting.
Plop the Ironing Board on top and trace around the edges.
(I used a pen cause I couldn't find my chalk marker buried under the mess you see on my work table!)
Cut around the marking leaving about a 1" seam allowance.
After flipping the ironing board right side up, with the Insul-Brite and batting on top, I draped a piece of Maisie's original fabric for lining and my fabric over it to make sure I had enough length.
Be sure to add 2-3 inches at each end so that you have enough to "play with" in making the drawstring casing.
Put the wrong side of lining together with batting.
[I wanted the Insul-Brite to be directly under the top fabric.
Not sure it matters much.]
Pin all the layers together right down the middle or pin along the tracing line.
This will keep your layers from shifting as you sew.
Stitch the battings to the lining only using the tracing lines as your guide.
You want the batting to just cover the top of the board so
trim as close as you dare to the seam.
Put the right sides of the fabrics together.
Stitch around about 1" out from the first seam to form the drawstring casing.
Be sure to leave an opening at the widest end for turning and for your drawstring.
[I stitched one more a seriously teeny distance outside this seam for extra strength in the drawstring casing.]
Trim the seam as close as you are comfortable.
Flip it right side out.
[Press it if you want]
Topstitch using the battings stitch line as your guide.
Insert your drawstring.
[I used cotton cording used in piping.]
Slap that baby on to the board.
Tighten the drawstring and secure.
[Wrapping it around the legs worked best for me.]
Now, get to work!!!
Holler if you have any questions and please go check out all the super sewing tutorials at The Creative Maven.
Happy 2nd Anniversary to our Will and Jennifer!!!
Love you!!!


This is super cute, Becky! And I LOVE the fabric! Thanks for posting the directions.
ReplyDeleteI really need to do this to my full-size ironing board! Thanks for linking up :)
ReplyDeleteskiptomylou.org and makingtheworldcuter.blogspot.com both have link ups on Mondays
ReplyDelete